Showing posts with label kitchen. Show all posts

Thursday, March 05, 2009

Seeing Red in a Cottage Kitchen

I've been fortunate to meet so many other "red lovers" in the last few days. I really appreciate all the thoughtful comments about my red cabinets. Someone asked me if it was a tough decision to choose a bold color such as red for our cabinetry and I have to say that for me, I didn't even have to think twice! Love, love, love red! (Now, picking the right shade of red was quite a different story!)

But you don't have to have red cabinets to have a red cottage kitchen. Red accents are just as lovely with cabinets of just about any color. It's a beautiful morning - just perfect for snapping photos, so I took a few shots of some of my red accents right now:

There are those berries again! You've seen them in my window sill as well. I found the big white bowl either at Goodwill or Marshall's on clearance. I bought it a while back, but I know that I didn't pay much (true to my thrifty form!).


A teapot from Ebay, platter, bowl, and eggs from Goodwill, vintage doily from Ebay (it was a part of a very large vintage doily collection- I struck gold with this one!), and dish towel from Wal-mart... Funny story about the eggs: One morning I decided that I was going to order some ceramic eggs online. But I first made a run to Goodwill, because...that's just what one should do on a Friday morning...and what do you know! I found these ceramic eggs all wrapped up and hidden down in a vase!


I bought lots of red and white cotton dish towels on clearance from Wal-mart a couple of weeks ago. They came in packs of three for just $2 per pack! I bought three packs to use just for decorative purposes. A couple towels sewn together would make a great little summer pillow cover, don't you think?


A little word stone I made a couple of years ago....


I bought faux apples at Wal-mart as well. Did you know that you can now buy them by the bag? The cashier ringing me up that day thought it was a real bag of apples! The old bowl is from Goodwill.


I hope you've enjoyed taking a peek at my recent red additions. I want to incorporate more robin's egg blue - just a little here and there as a secondary accent color - but it's a harder color to find. But you can bet that I'll also be on the lookout for that happy and delicious color red!

Posted by Twila Bird at 9:22 AM 13 comments  

Categories: accessories, cabinets, cottage, decorating, kitchen, thrifty finds

Friday, February 27, 2009

Cozy and Fun Kitchen Projects

When I'm not knee deep in piles of laundry or drywall dust, I might be making something fun like....

A "berry" red arrangement from my backyard to my window sill......


Or a cozy paper pennant to go above my kitchen sink.....


Or glittered letter magnets for my kitchen island....


Don't you agree that every once in a while, a girl just has to stop the world and...


What have you creative souls made lately? Please share and inspire me!

Posted by Twila Bird at 4:27 PM 37 comments  

Categories: accessories, cottage, crafts, decorating, kitchen

Tuesday, September 23, 2008

Tuesday's Kitchen


I'm preparing for my cake decorating class tonight, which involves baking a cake (I made chocolate) and about nine cups of frosting. Seriously, my waistline has expanded since starting these classes. What's a girl to do? Is it really possible to *not* eat cake?


Studio work continues. Yesterday I primed and painted the window trim for the "faux" skylights and still need to add another coat of paint. I also worked on the headboard and filled in the nail holes in the steps and also in the trim work hubs added to the studio a few days ago.

This coming weekend, I hope to get the ceiling painted and the fan and ceiling lights installed after their makeovers. I went to get the paint yesterday for the fan and the one light I have left to do and it was all gone - and was still out of stock today. It is Krylon Brown Camouflage spray paint. Yes, I know...that is quite the choice for paint but I've used this particular paint and color for so many applications and absolutely love it. It is a matte finish and sprays on so easily - and looks very much like oil rubbed bronze. You can add a clear coat as well for protection and sheen. I always hate to run out of it as it is my first choice for anything that I need painted brown. Try it out and see if you like it! (See the topiary in the photos above? The container was a terra cotta color but I painted it with the camouflage paint!)


If you haven't yet, please put your guess in for my studio remodel guessing contest. You all have come up with a lot of great and creative ideas for that antique headboard already! Thanks for playing!

Posted by Twila Bird at 12:48 PM 10 comments  

Categories: cakes, contest, cottage, craft room, food, kitchen, lighting, makeover, paint

Monday, July 28, 2008

My Favorite Cottage Things: Wooden Trivets + the "Best Chocolate Chip Cookies"

Up until fairly recently, Hubs would often joke that I have a knack for making biscuits that resemble cookies and cookies that look (and taste) like biscuits. He was right. I don't know what I was doing wrong, but no matter what recipe I tried or how meticulously I followed it, my cookies would just never turn out. I believe now that what I really needed all those years was my little old-fashion cottage kitchen to spark in me the determination to make the perfect cookie - even if it was the last thing I ever managed to do.

I have to admit that I didn't really *love* or feel attached to my almost renovated cottage kitchen until this past April when I began to do more cooking and baking. It had nothing to do with expensive appliance upgrades and state of the art cooking gadgets (I have neither, anyway) but I think it had more to do with finally feeling "at home" in the new space after getting thoroughly acquainted with it. With the two of us working happily and frequently together (the kitchen and I), we have become like old friends who feel confident that when we tackle a recipe, especially a cookie recipe, we will succeed...or at least get better with each attempt. Individually, people and old kitchens are imperfect and need work (and sometimes must be accepted "as is") , but my goodness, as a team - is there anything that they can't accomplish? Nevermind my fine lines and foibles - nevermind her unlevel floor and imperfectly installed countertop...when we're working together, those things are put out of mind and our focus is on creating something delicious and from our hearts!

So during these last few months, my dear old kitchen and I have set off to try our best at baking and in the process, have discovered some really great recipes. Out of all the ones I may share with you in the future, you have to know that I really and truly mean it when I say that you absolutely, positively, must try the "Best Chocolate Chip Cookie" recipe at least once in your lifetime, but preferably every week - if not more. I have tried so many chocolate chip cookie recipes and while most of them were tasty, they just weren't what I personally was looking for in a chocolate chip cookie (the old "it's not you, it's me" explanation). I like a good old-fashion chocolate chip cookie that is hearty, chunky, chewy, soft, and moist - and stays that way even the day after baking (there will be none left by the third day, just so you know). I've been on the search for this cookie for 15 years, and I'm happy to report that I've finally found it. Your personal chocolate chip cookie preference may be different but if not, do try this recipe and let me know what you think! Most of the 1500+ reviews were positive and the few that weren't, well, I believe those folks just have a different cookie style:)

Best Chocolate Chip Cookies


INGREDIENTS

* 1 cup butter, softened
* 1 cup white sugar
* 1 cup packed brown sugar
* 2 eggs
* 2 teaspoons vanilla extract
* 3 cups all-purpose flour
* 1 teaspoon baking soda
* 2 teaspoons hot water
* 1/2 teaspoon salt
* 2 cups semisweet chocolate chips
* 1 cup chopped walnuts (optional)


DIRECTIONS

1. Preheat oven to 350 degrees F
2. Cream together the butter, white sugar, and brown sugar until smooth. Beat in the eggs one at a time, then stir in the vanilla. Dissolve baking soda in hot water. Add to batter along with salt. Stir in flour, chocolate chips, and nuts. Drop by large spoonfuls onto ungreased pans.
3. Bake for about 10 minutes in the preheated oven, or until edges are nicely browned.

My personal notes:

I don't have one of those handy cookie scoops to ensure that each of my cookies are the same size, so I used two level tablespoons of dough, rolled up into a loose ball, for each cookie. They come out a perfect size and just the right thickness!

I baked my cookies for exactly 11 minutes and they were perfect. Try a test cookie for 10 minutes first and let cool, and see if you might like it even better.

After removing them from the oven, I let my cookies stand for just a few minutes until they were firm enough to transfer to a wire cooling rack. I let them cool completely and then stored them in an airtight plastic container. I layered them between sheets of wax paper just in case they tried to stick together!


Today, I was pondering the fact that I've got a few little growing collections of items that I didn't consciously realize I was collecting! I guess they are just little things that I always gravitate towards at thrift stores or yard sales without thinking "Oh, I'll add this to my collection!"

I've discovered that I happen to have an affinity for carved wooden trivets. I like the various sizes you can find and the intricate details on most of them. What I've found that I like to do is paint them, of course! I've already painted two of the five that I own and I'm pleased with how they turned out. I painted a white basecoat using spray paint, and then a few coats of red spray paint. After sanding and distressing the trivets to reveal the white undercoat here and there, I wiped them down with a dark tinted paste wax and then buffed, buffed, buffed.

I've never actually used the painted trivets as I'm afraid a hot pot would damage the finish, but I do like the way the trivets look as decorative accents. I've put the two red ones in my kitchen island and think they look sweet and dainty tucked in between the ironstone china. I'm sure they are feeling much too pretty now to be bearing up the load of a hefty old pot, anyway. "Let the practical potholders have that job!", they say:)

Posted by Twila Bird at 10:08 PM 18 comments  

Categories: accessories, collections, cottage, craft room, decorating, kitchen, makeover, paint, recipes, sweet treats

Saturday, July 26, 2008

1955 Good Housekeeping Cookbook

Do not walk, RUN to Ebay and snatch up a copy of this vintage cookbook from 1955, the Good Housekeeping Cookbook ! I found one at Goodwill yesterday and WOW, what a gem! There are over 3000 recipes in the book (760 pages!), from old-fashioned dishes to the "newer" dishes of the 1950's. There are plenty of practical kitchen tips as well. This is a great one to add to your cookbook collection. Vintage and antique cookbooks are so charming...through them, you can take a step back in time to the kitchens of your mother, grandmother, great-grandmother, and beyond.

As of this posting you can get this book for as little as 1.99! Check it out! And let me know if you order one! I know you'll love it as I do mine!

Posted by Twila Bird at 11:45 AM 7 comments  

Categories: cottage, homemaking, kitchen, nostalgia, recipes, resources, shop, thrifty finds

Tuesday, June 17, 2008

Fun with ( Faux ) Cake + More Blue Inspiration

Back in May, I finally got up the nerve to try my hand at making my first "faux" cake. I will at some point (when things settle down around here a bit) take cake decorating classes and honestly, I didn't plan on trying a cake until after I had several classes under my belt. But I got the itch and decided to give it a go.

So here are the results. Though it's far from perfect, I'm really, really pleased with how my first attempt turned out. I'm sorry that I can't give out the secret fake cake recipe, but I hope you enjoy looking at the photos:) I keep this cake on a plate stand in my kitchen.


I couldn't resist also making some coordinating yummies like baby cupcakes and some fancy cookies...


I'm going to love coming up with new designs and creations...it's so much fun making these inedible treats!


Here are a few more "bleu" inspiration photos that I've had on file for a while. Don't you just love this color?!

I love the idea of covering books with colorful paper and writing or painting words on the spine...


Doesn't red look pretty with this shade of blue?


Do you see the old blue bench in the background? Fabulous!


And more beautiful blue...

Posted by Twila Bird at 10:47 PM 21 comments  

Categories: accessories, cottage, crafts, decorating, inspiration, kitchen, sweet treats, Twice Remembered

Tuesday, May 13, 2008

Colorful and Cool Retro Appliances - or What We Like to Call "Eye Candy"

Of course I couldn't write this entry without thinking of Cottage Daisy and her sweet baby blue fridge that we have all (let's admit it) drooled over for the last couple of years. While we have already bought our average, everyday, run-of-the-mill appliances since our remodel began, I still get a thrill checking out what is available out there nowadays.

Wouldn't these appliances be perfect in a cottage style kitchen? And you can also get them in *custom* colors - weeee!. Range hoods are also available but they haven't yet been added to the site. Can't wait to see them!

Isn't if funny how we get excited about these classic style appliances like men do about old cars?


Where Credit is Due

Digital scrapbook elements obtained from http://digitalscrapbookgrapixs.blogspot.com/, http://dreamscrap.com, and http://flergalicious.com

Posted by Twila Bird at 9:34 AM 4 comments  

Categories: appliances, cottage, kitchen, nostalgia, resources

Wednesday, January 09, 2008

Red Cottage / Farmhouse Style Kitchen Progress Photos and Details- Almost There!

(Edited to add: Check out the article featuring my kitchen at Cottage Magpie - written by our dear and very talented Angela... thank you so much, Angela!)

Also, I'll be updating my blog link list soon! I've found so many great cottage, decorating, and remodeling blogs as of late and would love to add them all to my list! If you would like to be added, please email me your blog link... thank you!


(Scroll down to view all photos) Well, I keep calling it the "RED" cottage kitchen, but I guess it's only the cabinets that are red! But I can tell that red will be running accent color in our cottage, so why not?!

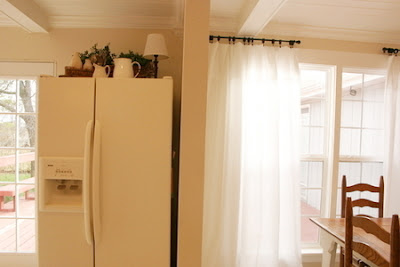
In one of my last entries, I mentioned that I had changed my mind about having green walls in the kitchen. For the last couple of years, they have been primed green in expectation of a soft green sagey color. Instead, I decided to go with an even lighter and softer look. I searched high and low for just the right shade of warm, off-white and I think I found it in a shade called "Malted Milk" (eggshell finish) from Valspar paints (at Lowes). I wanted something that would compliment my bisque appliances while also looking great with the pure white trim and ceiling color. The trim and ceiling color is called "Anthem White" (semi-gloss finish), also from Valspar at Lowes. For those of you that may be interested, the cabinet color is called "Cherry" (satin finish)from the Waverly collection at Lowes. Someone emailed me and said that there are lots of "cherry something" paint shades from Waverly, but this one is just plain "Cherry". I'll try to find the paint color code and post it. If you have more questions about the cabinets and finish, you may want to take a look at my FAQ page - and of course, feel free to email me with your questions, too!

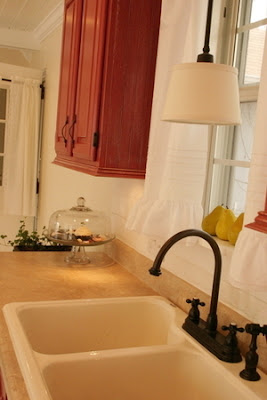
The lighting is from the House Beautiful collection from Kichler. I ordered the lights online a couple of years ago and unfortunately, I don't remember from which lighting site. I have checked all over to see if I can find this particular style again and I haven't been able to find it - I think it may be discontinued. BUT, you may be able to find it on Ebay...I have found my island light on EBAY for much less than what I paid for it. In fact, here is one on Ebay right now.

The undercabinet lights are little puck /disk lights that have been hardwired...we can turn them on and off by a switch. We used Xenon bulbs that have a nice warm glow to them.

The faucet is from the Kingston Brass "Restoration Collection" and the cabinet pulls are from the Adagio collection at Berenson Hardware. Thank you, Kelli for donating our cabinet pulls to us! I never mentioned that before because I wasn't sure if she wanted me, too, but I think she deserves a giant public THANK YOU for such a kind and unexpected act!

The countertops are laminate (from Lowes). I don't remember the name of this particular pattern, but it has a stone look to it with various shades of tan and brown with a little cream here and there. When we bought our countertops a couple of years ago, it was a standard pattern that they had available to buy right from the store without special ordering. We did have to order ours, though, because we needed a longer piece than what they had available. Something like soapstone would have been WONDERFUL, but we were, and ARE, on a very tight budget. If we ever sold our house, I don't know if we'd get a return on something higher end anyway because we live in a very modest neighborhood home prices are in the $120 - 160 (we live in TN). BUT, if it was ever in the budget, I'd probably go for it anyway!

The backsplash was created using brick pavers, also bought at Lowes. I painted them "Anthem White" but then aged and toned them down with a brown translucent glaze (burnt umber, I believe?). The sink is from American standard and is the color bisque. The appliances are all bisque as well.

The shelfpaper used inside the cabinets is actually wallpaper. I applied it the same as you would apply wallpaper, but then I applied 2-4 coats of clear polyeurothane for heavy duty protection. It's held up great so far! At some point, I'd like to add sweet little lace trimmings to the edge of the shelves. Wouldn't that be lovely?

The curtains in the dining room are actually queen sized sheets. I really need to hem them, but for a quick fix, I just folded the extra length over at the top and added clip on curtain rings. The curtains rings and rods are from Wal-Mart. The "curtains" above the sink are actually pillowcases I found at Goodwill! (If one really wanted to sleep in the kitchen, I suppose they really could with all the bedding I've put in there, ha!)

The flooring is actually just our subflooring painted white. If this was to be our permanent flooring choice, I would have done this project quite differently. Because we are ripping up and replacing all our subflooring this spring, I just chose to use a couple of coats of cheap semi-gloss paint. I needed a way to be able to sweep and mop our floor and have it look relatively clean until we replace it. (I'm so tired of remodeling grunge!) BUT, if I were going for a more long term flooring solution, I would have primed the subflooring a couple of times, then I would have used a good heavy duty floor paint that was scuff resistant. Additionally, I would have painted a brown diamond pattern over the white with mabybe a few coats of good polyeurothane for durability. Just so ya know:)

The ceiling is made up of individual 5 inch wide tongue and groove pine planks bought at Lumber Liquidators. I think it was about $1.60 a square foot - maybe even less than that. The beams are box beams (hollow inside):)

The flooring that we will be installing is solid oak hardwood from Bruce, in the Marsh finish. It's a color similar to our island top and table top.

Our dining table and kitchen island were made by Fuzzot Furniture. They make all their furniture using old house parts. Pretty nifty, huh?! They are out of GA, I believe, and also sell at a few flea markets in the southeastern part of the US.

The Twice Remembered sweets and treats under the glass dome were made by yours truly. Yes, someday I'll get my faux candy and treat business off the ground. I have to work a lot in the garage to make these sweets and I'm finding that this just isn't possible for me during the colder months. Also, I'm finding that when folks buy my candy, they like to buy several boxes at a time, which is GREAT! But my inventory disappears quickly and it's hard for me to stay stocked. I guess a nice problem to have, though! But I'm working on other crafts and items to sell until I can work in the garage again in the spring.

Most of the other accessories came from Goodwill, Ebay, or Old Time Pottery. I hardly ever by new, but when I do, I make sure it's not pricey!

Speaking of accessories, I'm looking forward to warming up the kitchen with other pieces as time goes by. We still have the flooring to put in, the beadboard (halfway up the wall) and doortrim to install, and after that point, I'll be able to better see what else I want to do. There are a couple of really blank walls that need attention, for sure! A work in progress! I know that after our doortrim is intalled, above the frenchdoors I want to install a long shelf supported by a couple of white wrought iron brackets. That door needs a little more presence, I believe.

Well, I hope this has answered a few questions! Let me know if you have more:) I wanted to also mention - and not for the purposes of bragging but for the sake of encouragement, that hubs and I did all the work so far ourselves with the exception of installing the brick pavers. I mention this because if we can do it, anyone can! We knew nothing of home renovation when we moved into our house 4 1/2 years ago and while it takes us forever to complete our projects (through lots of trial and error), it has saved us a ton of money. While it can be frustrating to have projects drag on so long, if that's the only choice you have besides not doing anything at all, then I say go for it! (Ok, that's what I say right now...yesterday I was saying something different, hehe!) But seriously, you can do it, little by little!

Now on to the photos! In no particluar order:

Kitchen BEFORE Photos (as it looked when we first moved in and shortly before our remodel began)


Kitchen AFTER (or almost After as we aren't finished yet!)


Dining area BEFORE


Dining area AFTER


Ceiling BEFORE


Ceiling AFTER


Now for a several general AFTER Photos...


This is where the whole thing started...with the cabinets!


This sweet treat platter was made using a cheese board dome. The bottom part is just a round mirror covered with a vintage doily:)


This is hard to see, but it's a stencil relief that I put all the way around the entryways to and from the kitchen and living room. I created it using a large stencil and drywall mud.


The pears are fake and are from Wal-mart... .99 each!


Feel free to share with me more decorating ideas! Thanks for stopping by! And thanks to all of you who have stopped by my Rate My Space page at HGTV and have given me a few stars... I appreciate that so much!

~Kim

Posted by Twila Bird at 8:27 AM 40 comments  

Categories: accessories, appliances, backsplash, cabinets, cottage, crafts, decorating, diningroom, doors, flooring, furniture, kitchen, lighting, makeover, paint, remodeling, trim, walls, windows

Older Posts Home
Subscribe to: Posts (Atom)


Dear readers,

My blog has moved!

Please join me at my new location:

{twiceremembered.blogspot.com}.

I hope to see you there!

~Kim
.


Twice Remembered © 2008 Free Premium Wordpress Themes and BlackQuanta | Bloggerized by : GosuBlogger