Showing posts with label flooring. Show all posts

Wednesday, January 09, 2008

Red Cottage / Farmhouse Style Kitchen Progress Photos and Details- Almost There!

(Edited to add: Check out the article featuring my kitchen at Cottage Magpie - written by our dear and very talented Angela... thank you so much, Angela!)

Also, I'll be updating my blog link list soon! I've found so many great cottage, decorating, and remodeling blogs as of late and would love to add them all to my list! If you would like to be added, please email me your blog link... thank you!


(Scroll down to view all photos) Well, I keep calling it the "RED" cottage kitchen, but I guess it's only the cabinets that are red! But I can tell that red will be running accent color in our cottage, so why not?!

In one of my last entries, I mentioned that I had changed my mind about having green walls in the kitchen. For the last couple of years, they have been primed green in expectation of a soft green sagey color. Instead, I decided to go with an even lighter and softer look. I searched high and low for just the right shade of warm, off-white and I think I found it in a shade called "Malted Milk" (eggshell finish) from Valspar paints (at Lowes). I wanted something that would compliment my bisque appliances while also looking great with the pure white trim and ceiling color. The trim and ceiling color is called "Anthem White" (semi-gloss finish), also from Valspar at Lowes. For those of you that may be interested, the cabinet color is called "Cherry" (satin finish)from the Waverly collection at Lowes. Someone emailed me and said that there are lots of "cherry something" paint shades from Waverly, but this one is just plain "Cherry". I'll try to find the paint color code and post it. If you have more questions about the cabinets and finish, you may want to take a look at my FAQ page - and of course, feel free to email me with your questions, too!

The lighting is from the House Beautiful collection from Kichler. I ordered the lights online a couple of years ago and unfortunately, I don't remember from which lighting site. I have checked all over to see if I can find this particular style again and I haven't been able to find it - I think it may be discontinued. BUT, you may be able to find it on Ebay...I have found my island light on EBAY for much less than what I paid for it. In fact, here is one on Ebay right now.

The undercabinet lights are little puck /disk lights that have been hardwired...we can turn them on and off by a switch. We used Xenon bulbs that have a nice warm glow to them.

The faucet is from the Kingston Brass "Restoration Collection" and the cabinet pulls are from the Adagio collection at Berenson Hardware. Thank you, Kelli for donating our cabinet pulls to us! I never mentioned that before because I wasn't sure if she wanted me, too, but I think she deserves a giant public THANK YOU for such a kind and unexpected act!

The countertops are laminate (from Lowes). I don't remember the name of this particular pattern, but it has a stone look to it with various shades of tan and brown with a little cream here and there. When we bought our countertops a couple of years ago, it was a standard pattern that they had available to buy right from the store without special ordering. We did have to order ours, though, because we needed a longer piece than what they had available. Something like soapstone would have been WONDERFUL, but we were, and ARE, on a very tight budget. If we ever sold our house, I don't know if we'd get a return on something higher end anyway because we live in a very modest neighborhood home prices are in the $120 - 160 (we live in TN). BUT, if it was ever in the budget, I'd probably go for it anyway!

The backsplash was created using brick pavers, also bought at Lowes. I painted them "Anthem White" but then aged and toned them down with a brown translucent glaze (burnt umber, I believe?). The sink is from American standard and is the color bisque. The appliances are all bisque as well.

The shelfpaper used inside the cabinets is actually wallpaper. I applied it the same as you would apply wallpaper, but then I applied 2-4 coats of clear polyeurothane for heavy duty protection. It's held up great so far! At some point, I'd like to add sweet little lace trimmings to the edge of the shelves. Wouldn't that be lovely?

The curtains in the dining room are actually queen sized sheets. I really need to hem them, but for a quick fix, I just folded the extra length over at the top and added clip on curtain rings. The curtains rings and rods are from Wal-Mart. The "curtains" above the sink are actually pillowcases I found at Goodwill! (If one really wanted to sleep in the kitchen, I suppose they really could with all the bedding I've put in there, ha!)

The flooring is actually just our subflooring painted white. If this was to be our permanent flooring choice, I would have done this project quite differently. Because we are ripping up and replacing all our subflooring this spring, I just chose to use a couple of coats of cheap semi-gloss paint. I needed a way to be able to sweep and mop our floor and have it look relatively clean until we replace it. (I'm so tired of remodeling grunge!) BUT, if I were going for a more long term flooring solution, I would have primed the subflooring a couple of times, then I would have used a good heavy duty floor paint that was scuff resistant. Additionally, I would have painted a brown diamond pattern over the white with mabybe a few coats of good polyeurothane for durability. Just so ya know:)

The ceiling is made up of individual 5 inch wide tongue and groove pine planks bought at Lumber Liquidators. I think it was about $1.60 a square foot - maybe even less than that. The beams are box beams (hollow inside):)

The flooring that we will be installing is solid oak hardwood from Bruce, in the Marsh finish. It's a color similar to our island top and table top.

Our dining table and kitchen island were made by Fuzzot Furniture. They make all their furniture using old house parts. Pretty nifty, huh?! They are out of GA, I believe, and also sell at a few flea markets in the southeastern part of the US.

The Twice Remembered sweets and treats under the glass dome were made by yours truly. Yes, someday I'll get my faux candy and treat business off the ground. I have to work a lot in the garage to make these sweets and I'm finding that this just isn't possible for me during the colder months. Also, I'm finding that when folks buy my candy, they like to buy several boxes at a time, which is GREAT! But my inventory disappears quickly and it's hard for me to stay stocked. I guess a nice problem to have, though! But I'm working on other crafts and items to sell until I can work in the garage again in the spring.

Most of the other accessories came from Goodwill, Ebay, or Old Time Pottery. I hardly ever by new, but when I do, I make sure it's not pricey!

Speaking of accessories, I'm looking forward to warming up the kitchen with other pieces as time goes by. We still have the flooring to put in, the beadboard (halfway up the wall) and doortrim to install, and after that point, I'll be able to better see what else I want to do. There are a couple of really blank walls that need attention, for sure! A work in progress! I know that after our doortrim is intalled, above the frenchdoors I want to install a long shelf supported by a couple of white wrought iron brackets. That door needs a little more presence, I believe.

Well, I hope this has answered a few questions! Let me know if you have more:) I wanted to also mention - and not for the purposes of bragging but for the sake of encouragement, that hubs and I did all the work so far ourselves with the exception of installing the brick pavers. I mention this because if we can do it, anyone can! We knew nothing of home renovation when we moved into our house 4 1/2 years ago and while it takes us forever to complete our projects (through lots of trial and error), it has saved us a ton of money. While it can be frustrating to have projects drag on so long, if that's the only choice you have besides not doing anything at all, then I say go for it! (Ok, that's what I say right now...yesterday I was saying something different, hehe!) But seriously, you can do it, little by little!

Now on to the photos! In no particluar order:

Kitchen BEFORE Photos (as it looked when we first moved in and shortly before our remodel began)


Kitchen AFTER (or almost After as we aren't finished yet!)


Dining area BEFORE


Dining area AFTER


Ceiling BEFORE


Ceiling AFTER


Now for a several general AFTER Photos...


This is where the whole thing started...with the cabinets!


This sweet treat platter was made using a cheese board dome. The bottom part is just a round mirror covered with a vintage doily:)


This is hard to see, but it's a stencil relief that I put all the way around the entryways to and from the kitchen and living room. I created it using a large stencil and drywall mud.


The pears are fake and are from Wal-mart... .99 each!


Feel free to share with me more decorating ideas! Thanks for stopping by! And thanks to all of you who have stopped by my Rate My Space page at HGTV and have given me a few stars... I appreciate that so much!

~Kim

Posted by Twila Bird at 8:27 AM 40 comments  

Categories: accessories, appliances, backsplash, cabinets, cottage, crafts, decorating, diningroom, doors, flooring, furniture, kitchen, lighting, makeover, paint, remodeling, trim, walls, windows

Wednesday, November 07, 2007

Has It Been a Month? Upcoming Plans

I have truly been out of the blogging loop for a whole month:( I just haven't had anything house related to share and honestly, I haven't felt up to being on the computer much at all. Our hard drive crashing recently hasn't helped, hehe.

Hopefully I'll have more to post about soon, though! I'm so excited that at the end of December, hubs and I are hosting at our home a huge two day gathering with some of our dear friends.

But, imagine hosting such an event in our poor little tumble down cottage-in-the-making...needless to say, our place is *not* very company friendly right now, what, with our ugly exposed subflooring, incompleted kitchen ceiling (and practically no kitchen lighting to speak of!), and half a million other little things that really should be taken care of before guests arrive. So long story short, we have just six or seven weeks to turn this place into a cottage cozy "feast and friend" friendly environment. Is this even possible for a variable construction site?

I don't know, but we're going to try. A have a notebook page long "to do" list, but here are a few of the major things that must be accomplished:

Kitchen ceiling completed - That means adding the rest of the crown and trim moulding, caulking, puttying, and painting. Then it's done. For good. We started on this well over a year ago and have been working on it as we've had the time and money. It's well past time to wrap this project up, don't you think?

Kitchen lighting installed - For the last year, we've been relying on a couple of lamps and one light over the sink. We have about four can lights, a dining area light, an island light, and a replacement light for over the sink to install. I have a mini oil rubbed bronze chandelier that I bought for the bathroom that I'm *thinking* about using for over the sink, but I'm not sure yet.

Paint the kitchen - We have some drywall sanding to do and a few areas to prime before we paint. I'll be so happy to get rid of our splotchy patched walls! Our walls currently look like they have some type of awful rash!

Do *something* about the flooring - *sigh*...the floors. I hate them. They look so dirty and awful. Installing our wood flooring now is not an option as we still have some floor issues to fix plus some other major projects to get out of the way first. But what to do!?! I think I've come up with a temporary solution that probably no sane person would even consider doing, but it will make floors look 100% better. More on that later.

Like I said, there are tons of other little things to do besides cleaning and decluttering - then menu planning, shopping, and so on.

So, another home-improvement-for-a-cause marathon for hubs and me. This should be interesting:)

Posted by Twila Bird at 9:21 PM 16 comments  

Categories: cottage, flooring, home, kitchen, makeover

Monday, September 24, 2007

What Goes Down Must Come Up

Needless to say, work on the cottage this summer has been slow. Time and money (or lack thereof!) has a way of causing plans to come to a screeching halt.

Not to be deterred, though, we've gone ahead and moved along with some of our demolition work. Afterall, it's free! One thorn in my side since we bought this place four years ago has been the flooring in the kitchen. The lino itself, the color and pattern, wasn't that bad, but it was not in the best of shape and had been poorly installed. Also, for some reason, there was a lovely flooring hump right in the middle of the room where the new kitchen addition was added to the old part of the house many years ago. For four years, we've wondered what caused the hump and if it was something that could be fixed.

So this weekend, we ripped out the top layer lino, the luan backing that was under it, and the original lino that had been installed when the house built. Seeing that original lino was quite a shock as I'm not a particular fan of harvest gold! And I'm pretty sure this it was the very same lino that was in our kitchen when I was a little girl!

So on with the photos!

The demolition begins...


Ah. The hump. I felt like we were exposing the spine of the kitchen when we got to this part. What was causing the hump? When the kitchen addition was added by the previous owners, it was ever so slightly higher than the old part of the kitchen. Instead of putting down new plywood on both the new and old part of the house and overlapping the plywood from the old side to the new side (thus joining the two parts together almost seamlessly), they tried to butt the new plywood and the old plywood together. They tried to chip away and sand down part of floor joist by a quarter of an inch to make the floor more level, but it didn't work. I don't think they chipped away quite enough. So then, they just smoothed over the descrepency with lots and lots and lots of some plaster like material. They did the same thing in the dining area where the room was enlarged during the last remodel. We couldn't believe how the subflooring was so piece milled together. No wonder the lino looked so horrible! You can enlarge the first photo at the beginning of this entry for a detailed explanation of everything that is wrong with our dining and kitchen flooring.


This old harvest gold lino against the primer green on the walls made me feel a bit nauseous. I couldn't get that flooring up fast enough! Mom, does this flooring look familiar?


So this is our flooring for now (below - and what flooring?). Pretty, isn't it?! We will be replacing the plywood subflooring before putting down our hardwood - but our new hardwood won't be going down anytime soon. We still have too much messy work to do and I don't want anything to happen to it. In the meantime - yuck, we'll have to live with this. And did I mention that it stinks? It smells like musty old linoleum. Maybe we'll at least replace the subflooring soon so I don't have to deal with the smell. Ah, the joys of remodeling. Well, at least I hope to have some great before and after pictures one of these days. It can only get better from here!

Posted by Twila Bird at 9:26 AM 17 comments  

Categories: cottage, diningroom, flooring, kitchen, remodeling

Friday, December 01, 2006

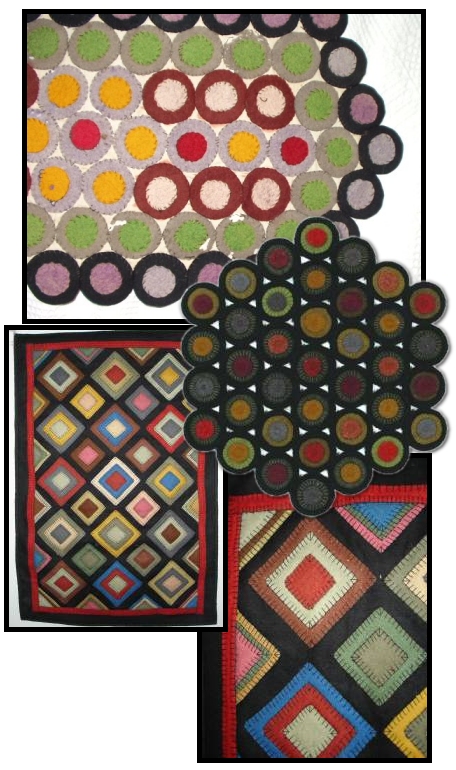
Old Fashion Penny Rugs

I love learning about "lost arts and crafts" and was very excited when I first discovered the beauty of penny rugs. The women of long ago were just as interested in adding color and texture to their homes as we are today - and many of them didn't have the option to order pretty things through the catalog at the general mercantile. So they had to make their own "pretty things"! The penny rug is a great example of how women used what they had to not only make what they needed, but to create beautiful pieces that I consider art.

From The Primitive Peddler:
Penny Rug History
In the 1800s, women would use scraps of wool or wool felt from old clothing and hats to create designs for mats or rugs. They would make circles using coins as a template. Each piece was then stitched in blanket stitch fashion. Sometimes, the mats or rugs were backed with old burlap bags or feed sacks. And to make the piece lie flat, a penny was stitched under one of the circles to weigh it down. Coins were so valuable then, that in today's world, if you are fortunate to find an antique piece containing one, you would have a very rare piece.


You can find more photos and information on penny rugs at TurkoTek -"a noncommercial site devoted to collectible weavings, where rug enthusiasts can connect". The photos I found mostly on Ebay under a Penny Rug search . You can find old penny rugs, or new - and the patterns don't have to be just circles. Rugs can be made in the penny rug fashion using any shape or pattern, as shown in the photos above and below. Maybe someday I'll try my hand at making a one myself!

Posted by Twila Bird at 9:51 AM 7 comments  

Categories: accessories, cottage, crafts, flooring, resources

Monday, July 17, 2006

More Painted Subfloor Goodness & Hardwood Choice

When you're working on an ongoing remodeling project with lots of dirt and drywall dust, and you have two dogs that shed...AND you have a child with allergies (or you have allergies yourself), carpet is absolutely out of the question, or at least it is in our house. I'd rather have no carpet at all than dirty carpet and let's face it, carpet at it's cleanest is dirtier than we care to know:) We're holding out until the very end to put our wood flooring down but until then, we have to make do with subflooring. I painted it an antique white about a week and a half ago and thought I'd share a photo of what it looked like after one coat. I applied two coats but forgot to take photos afterward. If you want to do this as a long term flooring solution, I would prime first and use a really good quality floor / porch paint, or else use several coats of polyeurothane over your paint choice...(And do lots of other research first because I'm not an expert:)


Our couch and loveseat have been moved back in by now along with a giant sisal rug, and the tape has been removed from the wall. Our living room isn't big at all but is still very cozy and comfortable and adequate. Excuse the total lack of decor and window coverings. One of these days I'll get to that. As a side note, and I think I've posted about it before, hubs added the trim around the window earlier this year. This house had *no* window trim whatsoever except for some measley window sills. We still have a few more windows in the house to trim out, but that is a project for another time:) The sample in the lower right hand corner represents the wood flooring we bought. I think it will really add some warmth to the house:)


I know some of you may be wondering *why* I put time and effort into painting a subfloor that will be covered over. Good question:) First of all, I painted it to prevent the little ones from getting splinters and secondly...it just looks better, lol!

Posted by Twila Bird at 10:31 PM 6 comments  

Categories: flooring, livingroom, paint, solutions

Wednesday, July 05, 2006

Cottage Cozy (but Gutted) Bathroom Temporary Makeover Pics

Gutted Bathroom + Guests = EEEK!

When a girl starts freaking out at the thought of guests having to shower or bathe in the world's scariest, darkest, and ugly gutted bathroom ever, she may take the craziest of measures. I never claimed to be sane, but I've always thought there is a solution for every problem if you thought about it long enough (which is what is getting me through this whole remodeling process...)

We gutted our bathroom back last year and so far, we've only installed the new tub. I get distracted easily and decided that I really wanted the kitchen to be finished first. So that left us with said dark and scary bathroom. I hate it and always rush in and out of there quickly when I need to shower. It's our only full bath, so our guests will have to use it, but I hated the thought of them having to be in such a cold and unviting space. Yep, something had to be done to make the space cottage cozy:)

With a few decorative items I had on hand, a new shower curtain and towels, dropcloth "walls", and a few coats of floor paint, I think it turned out great! Let me give you a tour..

(Clicko to Enlargo)


Here is where we began...Ugh!


And this is how it turned out! I'm sorry that the photos are a little dark - I didn't like how washed out the flash make the photos look. But the space itself is very bright and cheerful now! We painted the floor and added a disposable cloth dropcloths to the walls. Hubs thought this was silly but I think it makes the room looks much less cold and dreary.


I bought this old dresser for just $25 and gave it a quick shabby coat of off white paint. So sweet:)


My $6 new embroidered flower shower curtain....


I got the mirror at Goodwill and may some day paint it white. I put the big white bowl on there so guests can fill up with water if they want to just wash up...just like in the good old days!


I typed up my favorite words in various fonts, printed them out, tore them apart, and pinned them to the dropcloth wall. It gives you something interesting to look at and think about while you're soaking in the tub. Another idea is to print each word individually in a large font size and frame it. Less expensive than buying art!


I bought this old towel rack at the flea market a couple of years ago. I've never used it until now:)


The chair is another flea market find. I hung some dried flowers on it and added a couple of books for some added interested and color.


A little basket of soap and washcloths...


What gutted bathroom would be complete without a chamber pot? LOL, this is just for fun as it's not intended for actual use (though it is covering the hole in the floor where the toilet use to be!)


Nothing says cozy like fresh rolled up towels in a basket! Behind the basket, I layered a mirror behind it to bounce light and an old frame.


I nice new rug that looks "old" adds some color and warmth to the white floor...


So there you go...my gutted bathroom that happens to also be my favorite room in the house so far:)

Posted by Twila Bird at 11:42 AM 18 comments  

Categories: accessories, bathroom, flooring, furniture, solutions

Older Posts Home
Subscribe to: Posts (Atom)


Dear readers,

My blog has moved!

Please join me at my new location:

{twiceremembered.blogspot.com}.

I hope to see you there!

~Kim
.


Twice Remembered © 2008 Free Premium Wordpress Themes and BlackQuanta | Bloggerized by : GosuBlogger