Showing posts with label windows. Show all posts

Monday, December 08, 2008

Cottage Studio Ceiling Makeover Completed

First I'd like to thank all of you who stopped in and supported my blog sale last week! Your items have either already arrived or are due to arrive any day now. You may not realize it, but you've helped me take another step in accomplishing my business goals. Thank you so much!

Now, about that studio... We've actually been finished with the ceiling and walls for a little while now. We painted the walls a nice robin's egg blue and added additional trimwork to the steps. I still have a bunch of junk that I need to move out of the space before I can get some good photos of the entire studio so far, but I did snap a few shots of the ceiling. If you remember, we once had old skylights that were removed when we replaced our roof. This left four ugly plywood holes in the ceiling and I wasn't sure how I could make them look attractive until we could afford to redo the entire ceiling someday down the road. We also had a very ugly (and dusty!) ceiling fan and a couple of equally ugly lights that needed to be addressed. Replacing them was not an option because as usual, our budget is so tiny it's practically nonexistent:)

So here is the studio ceilng "BEFORE"....


And here it is "AFTER"....

(Click photos below to enlarge)


Despite the challenges and limitations, I think the ceiling makeover turned out pretty well! Hubs did a great job turning those plywood holes into "windows", didn't he? I painted a subtle sky background and used a stencil to add my sparrow. As for the light and fan makeover, thank goodness for my trusty brown camouflage paint! With a matte clear coat, they look like oil rubbed bronze fixtures! I did another fan makeover in my living room about three years ago with a different type of oil based paint, and let me tell you, what I used this time around was MUCH easier and faster! (I have a little bird - my Ginger - on my shoulder right now or else I'd go to the garage and check the spray can, but I believe it's either Rustoleum or Krylon brown camouflage paint. I got mine at Wal-Mart.)

Hubs has already built one of my craft tables. It just needs a few pieces of trim and it's ready to paint. It's got a tongue and groove pine top and is very farmhouse in style. Here is a shot of the table top before he put it all together. He cut the "tongue" part off and will add trim around the perimeter side edge of the tabletop. I thought about some kind of rope moulding but I think I'll probably just stick with plain, flat trim to keep the look simple. I have a glass top to go right on top for easy cleanup as I'm a very messy crafter. I look forward to being able to see our dining room table again because that's where all of my stuff has been for weeks!


I hope everyone is staying warm! We started using our fireplace this week and it's never been more welcomed!

Posted by Twila Bird at 5:00 PM 35 comments  

Categories: blog sale, ceilings, cottage, craft room, fan, furniture, lighting, makeover, office, paint, remodeling, solutions, studio, sunroom, walls, windows

Wednesday, January 30, 2008

Cottage Living Room Decorating - Adding Softness with a Touch of Romance

We've been working on the kitchen so much over the last year that it's become a rare thing for me to post anything that's not kitchen related, so I thought I'd give you all a break from all things "cottage kitchen"...Today we're going to venture into the living room and see what's changed in there over the last year!

(living room before photo, right)Has this ever happened to you? For years, you are a renter who must suffer through living with white or beige walls - and then finally you are a homeowner. You tell yourself that *never* again will you have white or beige walls and before you know it, your new home looks like the inside of kaleidoscope...and you love it! I do believe this is what happened to me after buying our home a few years ago. My living room has been I don't know how many shades of yellow, and at one time I very briefly had a red accent wall. You may as well have been in McDonald's and I never even bothered to take pictures of that design blunder! At some point I decided that all four walls should remain yellow and after I finally found the right shade, I was quite pleased for a year or so. I think then, too, my own personal cottage style was still in development and I was going for more of country farmhouse style look.

The more I researched the many different cottage styles, however, the more I realized how much I loved (and needed) a very simple, soft, and romantic color palette. (See what I mean here in this beautiful blog!) I'm not talking about pink or other pastels...I mean whites and beiges, the colors that I told myself I would never use again in my own home! But balanced out with a few sparing pops of color here and there - dark brown to black accents and the red kitchen cabinets, white and beige can be very pretty and restful! So, last month when we painted the kitchen, we also repainted the living room the same beige color. It's called Malted Milk from Valspar at Lowes. (photo, left)

As far as remodeling goes, we haven't really tackled the living room yet other than remudding the walls, painting them, adding window trim, and giving the fireplace a makeover. One of the major things to be done to living room includes replacing the ceiling. Hubs wants to reinsulate up there which involves tearing out the old cottage-cheese laden ceiling and replacing it with a tung and groove ceiling like we installed in our kitchen. We will also be adding hardwood floors (we still have the painted white subflooring), tearing out an unused coat closet to add some space for a secretrary style desk, replacing the front door, installing baseboards (you can see from the photos that we are still baseboard-less!), and *maybe* adding beadboard around the perimeter of the living room to about the height of the just below fireplace mantel. (I don't know...what do you think about that?) So lots of work to do in here down the road.

I've decided that the cottage look I'm going for is more of European country / farmhouse cottage style, leaning heavily toward a romantic French flavor. Perhaps like an artist's countryside retreat... can you picture it? Oooh la la!

I thought I'd highlight a few of the projects that I worked on recently for the living room. Do you remember this table? It was actually a small dining room table that I bought at Goodwill for $10. Well over a year ago, I had hubs cut it down to coffee table height and then I primed it. And it sat primed in our living room for a very, very, very long time. The photo of our yellow living room above shows the table in it's primed state. Would you believe that last month I finally actually painted it and distressed it? (Someone please tell me that it takes you a year to paint your furniture, too!) We love having this oversized coffee table - it's great for games, food, or just propping your feet up on! So be on the look out for those small dining tables at thrift stores...it's amazing how a little paint and a saw can transform them!

I love displaying my favorite pages of my favorite books, especially art and poetry books. To counterbalance all the white going on the room, I'm trying to infuse some darker accents like the mirrors, lamps, candlesticks, and the wooden box. I think I need a taller something for the coffee table...hmm....

I bought the white end tables at the Nashville Flea Market a few years back. They were already painted white! Oh, and go ahead...help yourself to the bowl of...books!

What's up with all the mirrors, Kim? Yeah, I have a lot of them. I picked up all those circular mirrors at Old Time Pottery several months ago for $1.99 to 5.99 per mirror - not bad! It wasn't until last month that I finally hadsomething hanging above the sofa in the 4 1/2 years we've lived here! The big white mirror I found at a yard sale last year. You've seen it before when it was gold - remember? It was always my plan to paint it white and distress it and I'm happy to say that I got around to that project last month, too. I may end up adding some old white plates to this mirror grouping, too. The pillows are just standard sized pillows (like the ones you sleep on) covered with decorative cotton pillow shams. I've been on the lookout for a very long time for the perfect throw pillows but haven't found them yet. These pillows, though, work great! When we lounge on the couch, we use these pillows and really get comfortable! When the shams get soiled, I toss them in the wash and they are as good as new again.

First let me say that you are indeed seeing those two white partridges again, hehe. They somehow end up in all my little photo shoots. They are like the Where's Waldo of my cottage world...look hard enough and you'll always find them:) But the jewel of this photo is the teacup and saucer! Oh.My.Goodness! When I found these along with about 11 other cups, a few saucers and bowls, and a small cream pitcher, I just about kissed the nearest Goodwill associate. You better bet I rooted around for half an hour to find more pieces but alas, no large plates or sugar bowl or anything else. I did find out that this sweet pattern is called "Millbrook" made by Independence Ironstone. What I have is old (lots of crazing) but not too old - this particular pattern dates back to the 50's or 60's. I'm going to make it my goal to pick up pieces here and there online (they aren't that hard find!) and slowly build my collection. I never thought I'd fall in love with and collect a particular china pattern! I guess the problem was that I just never found the right one. Thank you, Goodwill!

The entryway into the kitchen was very stark and I wanted to come up with a way to soften it a bit and add a little more interest. Here in the background you can see the almost sheer cotton curtains I hung and swagged behind this large ivy topiary, another Goodwill find. If I remember correctly, the pot was purple but I painted it out in white. One advantage to having the topiary here is that it prevents the kids from running through the curtains like they would sheets on a clothesline on a warm summer day:)

This photo gives you an idea of how the entryway to the kitchen looks now with the romantic curtain addition. I purchased those curtains, perfect condition, at Goodwill, too. They are the Shabby Chic brand by Rachel Ashwell. The wall with the white chair would be a great place for' something interesting. For now, I'm pleased to have this open space. I bought some good canvas a couple of months ago to create my own floorcloth and I'm thinking this stretch of space would be the perfect location for it. I just need to come up with a design...still thinking about that one! Oh, and meet my corgi, Cara Bella:)

Let me preface the following photos by saying that I hate the giant elephant in the corner - that huge TV. I enjoy having a large screen but I hate the fact that I can see it. Do you know what I mean? How I'd love to have a cabinet in which to hide it away...or a sleeker flat screen, or better yet, another room entirely for the television! Unfortunately, I have none of those and there is no getting around the fact that I have to decorate with the said elephant in the corner. Add to that, our living room is really small and there really is nowhere else in the room to move it. *sigh* So there it is. Let's just pretend we don't see it. I don't see it. Do you? I just moved the loveseat in front of the window a few days ago. Originally it was perpendicular to the couch, but I needed a change.

On the floor leaning against the wall is my growing collection of frames and mirrors. The large white one was originally gold. I think I want to make that one into a chalk board and just lean it up against the island in the kitchen. And I can't believe I finally have curtains up in the living room! The are long linen curtains from West Elm. I bought them a couple of years ago on Ebay - new and still in the package - for a fraction of the cost of buying them retail! It took me a little while to collect all four panels from various sellers, but as you know, I don't get in a hurry very easily:) As for the little round table, it was stained a honey color but I sanded it down, primed, painted, and distressed it. (I bought it at Wal-mart on clearance at a great price for solid wood...actually, I bought two!)

This is another Goodwill mirror. It's one of those heavy duty plastic mirrors that was originally gold. I removed the mirror, sprayed it with a dark brown paint, sanded it just a bit, popped the mirror back in and voila! Say hi to Penelope my beagle warming herself in front of the fire...

I hope you enjoyed this recap of my recent living room changes. Though we still have a lot to do renovationwise in here, it's been fun working on these smaller decorative projects for a change:)

I hope everyone is staying warm and dry!

~Kim

Posted by Twila Bird at 7:36 PM 29 comments  

Categories: accessories, art, books, cottage, decorating, design plans, livingroom, makeover, paint, walls, windows

Wednesday, January 09, 2008

Red Cottage / Farmhouse Style Kitchen Progress Photos and Details- Almost There!

(Edited to add: Check out the article featuring my kitchen at Cottage Magpie - written by our dear and very talented Angela... thank you so much, Angela!)

Also, I'll be updating my blog link list soon! I've found so many great cottage, decorating, and remodeling blogs as of late and would love to add them all to my list! If you would like to be added, please email me your blog link... thank you!


(Scroll down to view all photos) Well, I keep calling it the "RED" cottage kitchen, but I guess it's only the cabinets that are red! But I can tell that red will be running accent color in our cottage, so why not?!

In one of my last entries, I mentioned that I had changed my mind about having green walls in the kitchen. For the last couple of years, they have been primed green in expectation of a soft green sagey color. Instead, I decided to go with an even lighter and softer look. I searched high and low for just the right shade of warm, off-white and I think I found it in a shade called "Malted Milk" (eggshell finish) from Valspar paints (at Lowes). I wanted something that would compliment my bisque appliances while also looking great with the pure white trim and ceiling color. The trim and ceiling color is called "Anthem White" (semi-gloss finish), also from Valspar at Lowes. For those of you that may be interested, the cabinet color is called "Cherry" (satin finish)from the Waverly collection at Lowes. Someone emailed me and said that there are lots of "cherry something" paint shades from Waverly, but this one is just plain "Cherry". I'll try to find the paint color code and post it. If you have more questions about the cabinets and finish, you may want to take a look at my FAQ page - and of course, feel free to email me with your questions, too!

The lighting is from the House Beautiful collection from Kichler. I ordered the lights online a couple of years ago and unfortunately, I don't remember from which lighting site. I have checked all over to see if I can find this particular style again and I haven't been able to find it - I think it may be discontinued. BUT, you may be able to find it on Ebay...I have found my island light on EBAY for much less than what I paid for it. In fact, here is one on Ebay right now.

The undercabinet lights are little puck /disk lights that have been hardwired...we can turn them on and off by a switch. We used Xenon bulbs that have a nice warm glow to them.

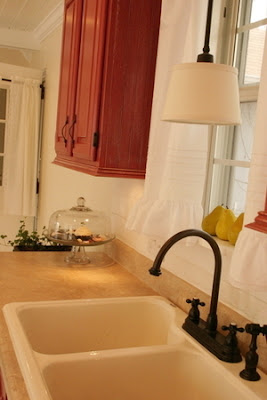
The faucet is from the Kingston Brass "Restoration Collection" and the cabinet pulls are from the Adagio collection at Berenson Hardware. Thank you, Kelli for donating our cabinet pulls to us! I never mentioned that before because I wasn't sure if she wanted me, too, but I think she deserves a giant public THANK YOU for such a kind and unexpected act!

The countertops are laminate (from Lowes). I don't remember the name of this particular pattern, but it has a stone look to it with various shades of tan and brown with a little cream here and there. When we bought our countertops a couple of years ago, it was a standard pattern that they had available to buy right from the store without special ordering. We did have to order ours, though, because we needed a longer piece than what they had available. Something like soapstone would have been WONDERFUL, but we were, and ARE, on a very tight budget. If we ever sold our house, I don't know if we'd get a return on something higher end anyway because we live in a very modest neighborhood home prices are in the $120 - 160 (we live in TN). BUT, if it was ever in the budget, I'd probably go for it anyway!

The backsplash was created using brick pavers, also bought at Lowes. I painted them "Anthem White" but then aged and toned them down with a brown translucent glaze (burnt umber, I believe?). The sink is from American standard and is the color bisque. The appliances are all bisque as well.

The shelfpaper used inside the cabinets is actually wallpaper. I applied it the same as you would apply wallpaper, but then I applied 2-4 coats of clear polyeurothane for heavy duty protection. It's held up great so far! At some point, I'd like to add sweet little lace trimmings to the edge of the shelves. Wouldn't that be lovely?

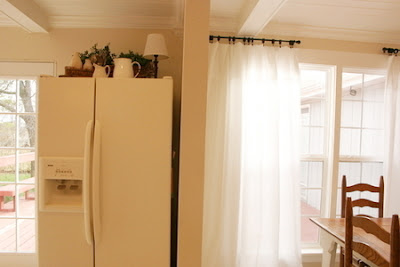
The curtains in the dining room are actually queen sized sheets. I really need to hem them, but for a quick fix, I just folded the extra length over at the top and added clip on curtain rings. The curtains rings and rods are from Wal-Mart. The "curtains" above the sink are actually pillowcases I found at Goodwill! (If one really wanted to sleep in the kitchen, I suppose they really could with all the bedding I've put in there, ha!)

The flooring is actually just our subflooring painted white. If this was to be our permanent flooring choice, I would have done this project quite differently. Because we are ripping up and replacing all our subflooring this spring, I just chose to use a couple of coats of cheap semi-gloss paint. I needed a way to be able to sweep and mop our floor and have it look relatively clean until we replace it. (I'm so tired of remodeling grunge!) BUT, if I were going for a more long term flooring solution, I would have primed the subflooring a couple of times, then I would have used a good heavy duty floor paint that was scuff resistant. Additionally, I would have painted a brown diamond pattern over the white with mabybe a few coats of good polyeurothane for durability. Just so ya know:)

The ceiling is made up of individual 5 inch wide tongue and groove pine planks bought at Lumber Liquidators. I think it was about $1.60 a square foot - maybe even less than that. The beams are box beams (hollow inside):)

The flooring that we will be installing is solid oak hardwood from Bruce, in the Marsh finish. It's a color similar to our island top and table top.

Our dining table and kitchen island were made by Fuzzot Furniture. They make all their furniture using old house parts. Pretty nifty, huh?! They are out of GA, I believe, and also sell at a few flea markets in the southeastern part of the US.

The Twice Remembered sweets and treats under the glass dome were made by yours truly. Yes, someday I'll get my faux candy and treat business off the ground. I have to work a lot in the garage to make these sweets and I'm finding that this just isn't possible for me during the colder months. Also, I'm finding that when folks buy my candy, they like to buy several boxes at a time, which is GREAT! But my inventory disappears quickly and it's hard for me to stay stocked. I guess a nice problem to have, though! But I'm working on other crafts and items to sell until I can work in the garage again in the spring.

Most of the other accessories came from Goodwill, Ebay, or Old Time Pottery. I hardly ever by new, but when I do, I make sure it's not pricey!

Speaking of accessories, I'm looking forward to warming up the kitchen with other pieces as time goes by. We still have the flooring to put in, the beadboard (halfway up the wall) and doortrim to install, and after that point, I'll be able to better see what else I want to do. There are a couple of really blank walls that need attention, for sure! A work in progress! I know that after our doortrim is intalled, above the frenchdoors I want to install a long shelf supported by a couple of white wrought iron brackets. That door needs a little more presence, I believe.

Well, I hope this has answered a few questions! Let me know if you have more:) I wanted to also mention - and not for the purposes of bragging but for the sake of encouragement, that hubs and I did all the work so far ourselves with the exception of installing the brick pavers. I mention this because if we can do it, anyone can! We knew nothing of home renovation when we moved into our house 4 1/2 years ago and while it takes us forever to complete our projects (through lots of trial and error), it has saved us a ton of money. While it can be frustrating to have projects drag on so long, if that's the only choice you have besides not doing anything at all, then I say go for it! (Ok, that's what I say right now...yesterday I was saying something different, hehe!) But seriously, you can do it, little by little!

Now on to the photos! In no particluar order:

Kitchen BEFORE Photos (as it looked when we first moved in and shortly before our remodel began)


Kitchen AFTER (or almost After as we aren't finished yet!)


Dining area BEFORE


Dining area AFTER


Ceiling BEFORE


Ceiling AFTER


Now for a several general AFTER Photos...


This is where the whole thing started...with the cabinets!


This sweet treat platter was made using a cheese board dome. The bottom part is just a round mirror covered with a vintage doily:)


This is hard to see, but it's a stencil relief that I put all the way around the entryways to and from the kitchen and living room. I created it using a large stencil and drywall mud.


The pears are fake and are from Wal-mart... .99 each!


Feel free to share with me more decorating ideas! Thanks for stopping by! And thanks to all of you who have stopped by my Rate My Space page at HGTV and have given me a few stars... I appreciate that so much!

~Kim

Posted by Twila Bird at 8:27 AM 40 comments  

Categories: accessories, appliances, backsplash, cabinets, cottage, crafts, decorating, diningroom, doors, flooring, furniture, kitchen, lighting, makeover, paint, remodeling, trim, walls, windows

Older Posts Home
Subscribe to: Posts (Atom)


Dear readers,

My blog has moved!

Please join me at my new location:

{twiceremembered.blogspot.com}.

I hope to see you there!

~Kim
.


Twice Remembered © 2008 Free Premium Wordpress Themes and BlackQuanta | Bloggerized by : GosuBlogger