Showing posts with label doors. Show all posts

Monday, July 07, 2008

Another Cottage Project: Raising the Hallway Ceiling

We had a very productive (albeit messy, hot, and exhausting ) weekend here at our Twice Remembered Cottage. We got started with our hallway project! Our hall is very long and what made it very unappealing to me was it's extremely low ceiling. I'm only about 5'5" and I could literally touch the ceiling without much effort. It has long been our goal to someday raise the ceiling there, which I hoped would visually open up the narrow space a bit. This weekend, we did just that.

So here is where we started - our very gloomy and sometimes scary hallway. We've gone ahead and replaced all the hollow core doors with solid pine doors except for that one there on the right...we're working in that particular room (expanding a closet) and have waited to put up the door there until we're ready to also put up the new closet door. Anyway, can you see how close the ceiling is to the top of doors? There is absolutely no room for the beefy 5 inch wide door trim I want to add around the doors - and no room for crown moulding and a pine plank ceiling either. Clearly, the ceiling needed to be raised.


The first cut... Who knew cutting through popcorn could be so easy and exciting?


There's no going back now!


This photo reveals the air conditioning duct work! This would have been a problem, but don't worry... this is unused duct work from the old original air conditioning system installed 30 years ago. A new system (with duct work under our floor) was added several years back and the old one remained to fossilize in our ceiling, I suppose. But this explains why the ceiling was so low to begin with. Fortunately hubby had crawled into the attic to investigate well before we decided to tackle this project:)


I thought I'd take a photo of the "big mess" being created already. But compared to what was to come, this was nothing!


Within minutes, the old drywall was completely removed from the ceiling and we could get a good view of the old metal monster that was hiding above.... I had to help hubs remove the duct work and I was so afraid it was going to fall on my head! I had to hold one end as I stood on a ladder while hubs unscrewed it from the center and other end. Talk about scary!


Our first good view of our new ceiling height! Whew, it sure was dirty up there!


Another whole foot added to the ceiling height - from 7 feet to 8 feet just like that!


The metal monster wasn't so intimidating when it wasn't hanging by a few screws above my head.


Now to begin ripping out the hall walls...


See what I meant about it getting messier?


A good friend came by and helped hubs hang the drywall for the new ceiling. I tried but have absolutely no upper body strength and proved to be a pretty puny and clumsy helper. Hubs forgot to cut the hole for the light but he can go back and do that. I'm thinking about hanging an old fashioned baby chandelier, but hubs isn't thrilled. I think it will grow on him;)


I love the results so far - the hall really feels so much more spacious now! I really can't wait to add our plank ceilings and crown moulding, tall white beadboard, wide door trim (with maybe a nifty antique metal number above each door..."Where is your bathroom?" ...."Oh, it's down the hall, Room 2."), and of course, our long awaited wood flooring. But this is where we leave of for now because today, Monday, it's business as usual for hubs and his real job. We'll save the walls for another free weekend. I hope you enjoyed this little tour of our most recent cottage transformation project!

Posted by Twila Bird at 3:07 PM 23 comments  

Categories: ceilings, cottage, doors, hallway, remodeling, solutions, walls

Tuesday, March 04, 2008

Life Comes at You Fast

Isn't that the truth?! I have to admit, I've been pretty bummed as of late because this year (so far) hasn't gone at all as I had planned. Our 13 year old van finally died. We knew it could happen at any time at this point, but we were hoping it wouldn't be this year. Afterall, we had big plans for this years tax refund - lots of home renovation projects to complete! Instead, we ended up purchasing a (new to us) van to replace our old one...there was just no getting around it. So I've had to spend a little time readjusting my attitude and reminding myself that all good things are worth the wait:).

One thing that I've noticed about myself, and I suppose this is a good thing, is that when things get tough, after the initial "Wow, this really, really stinks", I somehow manage to pull myself up by the bootstraps and try to figure out what step to take next. If I can't do anything about A, what can I do about B, C, or D? Now, sometimes it takes me a while - days or even weeks - to come to the realization that I haven't actually lost control of every single aspect of my life (as my overly dramatic inner self leads me to believe sometimes). But eventually I do come to the sensible conclusion that I've only hit a bump in the road and that I can either pull over and bemoan the bump or I can just keep driving and see where the road leads me. Or I slap myself silly while yelling "Pull yourself together, Woman!!! That works, too.

So we've been working on B, C, and D. We still had a few of our pine doors to install and so that is what we've been working on over the last couple of weekends. Oh how I love a solid wood door! There is nothing in the world like it (there goes my overly dramatic side again). The sound of a wooden door closing shut, to me anyway, is just melodious. One thing you don't know about me is that when no one is watching, I'll stand in the hallway and just open and close doors just to hear them shut. Ahhh...Does anyone know what I'm talking about? We have one more door to install and a couple more to order, and in the meantime we can be adding the little wood appliques to the door like we did in the door above.

One non-remodeling project that I've been wanting to get around to for a couple of years now is cleaning out our "attic" space. It's not actually an attic, it's really an unfinished bonus space above the garage, but either way, it's crammed to capacity with S T U F F. Clothes, toys, yard sale finds, old games, junk...you name it. There is so much up there and I've just been overwelmed by it all and have tried to ignore it, but it's just getting worse. So in my campaign against excess, I'll be tackling the bonus space (and the sunroom where lots of stuff seems to land) and having a yard sale this spring. I feel like these spaces have been holding me back in other areas of my life - when we're in the middle of a big renovation project or I'm thinking about pulling out my crafts, I can't help but to think about what I *should* be working on instead, namely, the junk spaces. I would love to just go ahead and get those areas cleaned out so I don't have to worry them anymore. I'm really trying to just get rid of things that I either don't have the room for or don't love as much as I once did. Why not pass them along for someone else to enjoy for a while? I sold the antique and vintage collection pictured above on Ebay last week and will be shipping it to it's new home tomorrow. Ahhhh - feels nice! I'm not impressed, though, with Ebay's fee increase and think I'll keep things local from now on with Craigslist or post a few things on my blog if I think I have something cottage lovers would be interested in.

I've also been really busy working on trying to get things in order for my little "Sweetest Treats You'll Never Eat" (faux desserts) business . I know, I was suppose to be on the ball with this last fall, but I'm realizing how I just don't function well without all my ducks in a row first. Clearing out space in our bonus area is part of the process because I'm quickly running out of space to store materials and products. But ohhhhh...I have so much planned that I can hardly sleep! I'm in the process now of taking photos of all the treats I've been working on over the last couple of months and I'll soon post them here and on my shop blog and make them available for purchase for those that are interested. I keep bouncing back and forth between using Etsy or my own website (even though my own website is 98% complete at this point!). I really need to move some of my inventory to make room for more - and let's face it, reclaim our kitchen island and use it for it's intended purpose, namely *real* (not faux) food preparation! I'm so pleased with what I've put together so far and my head is spinning with more ideas --- I can't wait to see them come to fruition!

How are your spring projects coming along? Hope you all are doing well!

Posted by Twila Bird at 9:01 PM 22 comments  

Categories: cleaning, cottage, crafts, doors, organization, sweet treats, Twice Remembered

Wednesday, January 09, 2008

Red Cottage / Farmhouse Style Kitchen Progress Photos and Details- Almost There!

(Edited to add: Check out the article featuring my kitchen at Cottage Magpie - written by our dear and very talented Angela... thank you so much, Angela!)

Also, I'll be updating my blog link list soon! I've found so many great cottage, decorating, and remodeling blogs as of late and would love to add them all to my list! If you would like to be added, please email me your blog link... thank you!


(Scroll down to view all photos) Well, I keep calling it the "RED" cottage kitchen, but I guess it's only the cabinets that are red! But I can tell that red will be running accent color in our cottage, so why not?!

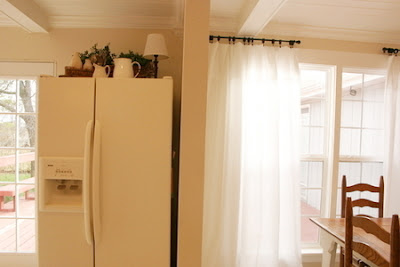
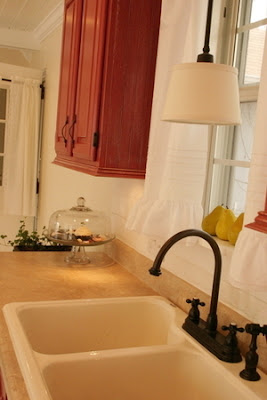
In one of my last entries, I mentioned that I had changed my mind about having green walls in the kitchen. For the last couple of years, they have been primed green in expectation of a soft green sagey color. Instead, I decided to go with an even lighter and softer look. I searched high and low for just the right shade of warm, off-white and I think I found it in a shade called "Malted Milk" (eggshell finish) from Valspar paints (at Lowes). I wanted something that would compliment my bisque appliances while also looking great with the pure white trim and ceiling color. The trim and ceiling color is called "Anthem White" (semi-gloss finish), also from Valspar at Lowes. For those of you that may be interested, the cabinet color is called "Cherry" (satin finish)from the Waverly collection at Lowes. Someone emailed me and said that there are lots of "cherry something" paint shades from Waverly, but this one is just plain "Cherry". I'll try to find the paint color code and post it. If you have more questions about the cabinets and finish, you may want to take a look at my FAQ page - and of course, feel free to email me with your questions, too!

The lighting is from the House Beautiful collection from Kichler. I ordered the lights online a couple of years ago and unfortunately, I don't remember from which lighting site. I have checked all over to see if I can find this particular style again and I haven't been able to find it - I think it may be discontinued. BUT, you may be able to find it on Ebay...I have found my island light on EBAY for much less than what I paid for it. In fact, here is one on Ebay right now.

The undercabinet lights are little puck /disk lights that have been hardwired...we can turn them on and off by a switch. We used Xenon bulbs that have a nice warm glow to them.

The faucet is from the Kingston Brass "Restoration Collection" and the cabinet pulls are from the Adagio collection at Berenson Hardware. Thank you, Kelli for donating our cabinet pulls to us! I never mentioned that before because I wasn't sure if she wanted me, too, but I think she deserves a giant public THANK YOU for such a kind and unexpected act!

The countertops are laminate (from Lowes). I don't remember the name of this particular pattern, but it has a stone look to it with various shades of tan and brown with a little cream here and there. When we bought our countertops a couple of years ago, it was a standard pattern that they had available to buy right from the store without special ordering. We did have to order ours, though, because we needed a longer piece than what they had available. Something like soapstone would have been WONDERFUL, but we were, and ARE, on a very tight budget. If we ever sold our house, I don't know if we'd get a return on something higher end anyway because we live in a very modest neighborhood home prices are in the $120 - 160 (we live in TN). BUT, if it was ever in the budget, I'd probably go for it anyway!

The backsplash was created using brick pavers, also bought at Lowes. I painted them "Anthem White" but then aged and toned them down with a brown translucent glaze (burnt umber, I believe?). The sink is from American standard and is the color bisque. The appliances are all bisque as well.

The shelfpaper used inside the cabinets is actually wallpaper. I applied it the same as you would apply wallpaper, but then I applied 2-4 coats of clear polyeurothane for heavy duty protection. It's held up great so far! At some point, I'd like to add sweet little lace trimmings to the edge of the shelves. Wouldn't that be lovely?

The curtains in the dining room are actually queen sized sheets. I really need to hem them, but for a quick fix, I just folded the extra length over at the top and added clip on curtain rings. The curtains rings and rods are from Wal-Mart. The "curtains" above the sink are actually pillowcases I found at Goodwill! (If one really wanted to sleep in the kitchen, I suppose they really could with all the bedding I've put in there, ha!)

The flooring is actually just our subflooring painted white. If this was to be our permanent flooring choice, I would have done this project quite differently. Because we are ripping up and replacing all our subflooring this spring, I just chose to use a couple of coats of cheap semi-gloss paint. I needed a way to be able to sweep and mop our floor and have it look relatively clean until we replace it. (I'm so tired of remodeling grunge!) BUT, if I were going for a more long term flooring solution, I would have primed the subflooring a couple of times, then I would have used a good heavy duty floor paint that was scuff resistant. Additionally, I would have painted a brown diamond pattern over the white with mabybe a few coats of good polyeurothane for durability. Just so ya know:)

The ceiling is made up of individual 5 inch wide tongue and groove pine planks bought at Lumber Liquidators. I think it was about $1.60 a square foot - maybe even less than that. The beams are box beams (hollow inside):)

The flooring that we will be installing is solid oak hardwood from Bruce, in the Marsh finish. It's a color similar to our island top and table top.

Our dining table and kitchen island were made by Fuzzot Furniture. They make all their furniture using old house parts. Pretty nifty, huh?! They are out of GA, I believe, and also sell at a few flea markets in the southeastern part of the US.

The Twice Remembered sweets and treats under the glass dome were made by yours truly. Yes, someday I'll get my faux candy and treat business off the ground. I have to work a lot in the garage to make these sweets and I'm finding that this just isn't possible for me during the colder months. Also, I'm finding that when folks buy my candy, they like to buy several boxes at a time, which is GREAT! But my inventory disappears quickly and it's hard for me to stay stocked. I guess a nice problem to have, though! But I'm working on other crafts and items to sell until I can work in the garage again in the spring.

Most of the other accessories came from Goodwill, Ebay, or Old Time Pottery. I hardly ever by new, but when I do, I make sure it's not pricey!

Speaking of accessories, I'm looking forward to warming up the kitchen with other pieces as time goes by. We still have the flooring to put in, the beadboard (halfway up the wall) and doortrim to install, and after that point, I'll be able to better see what else I want to do. There are a couple of really blank walls that need attention, for sure! A work in progress! I know that after our doortrim is intalled, above the frenchdoors I want to install a long shelf supported by a couple of white wrought iron brackets. That door needs a little more presence, I believe.

Well, I hope this has answered a few questions! Let me know if you have more:) I wanted to also mention - and not for the purposes of bragging but for the sake of encouragement, that hubs and I did all the work so far ourselves with the exception of installing the brick pavers. I mention this because if we can do it, anyone can! We knew nothing of home renovation when we moved into our house 4 1/2 years ago and while it takes us forever to complete our projects (through lots of trial and error), it has saved us a ton of money. While it can be frustrating to have projects drag on so long, if that's the only choice you have besides not doing anything at all, then I say go for it! (Ok, that's what I say right now...yesterday I was saying something different, hehe!) But seriously, you can do it, little by little!

Now on to the photos! In no particluar order:

Kitchen BEFORE Photos (as it looked when we first moved in and shortly before our remodel began)


Kitchen AFTER (or almost After as we aren't finished yet!)


Dining area BEFORE


Dining area AFTER


Ceiling BEFORE


Ceiling AFTER


Now for a several general AFTER Photos...


This is where the whole thing started...with the cabinets!


This sweet treat platter was made using a cheese board dome. The bottom part is just a round mirror covered with a vintage doily:)


This is hard to see, but it's a stencil relief that I put all the way around the entryways to and from the kitchen and living room. I created it using a large stencil and drywall mud.


The pears are fake and are from Wal-mart... .99 each!


Feel free to share with me more decorating ideas! Thanks for stopping by! And thanks to all of you who have stopped by my Rate My Space page at HGTV and have given me a few stars... I appreciate that so much!

~Kim

Posted by Twila Bird at 8:27 AM 40 comments  

Categories: accessories, appliances, backsplash, cabinets, cottage, crafts, decorating, diningroom, doors, flooring, furniture, kitchen, lighting, makeover, paint, remodeling, trim, walls, windows

Older Posts Home
Subscribe to: Posts (Atom)


Dear readers,

My blog has moved!

Please join me at my new location:

{twiceremembered.blogspot.com}.

I hope to see you there!

~Kim
.


Twice Remembered © 2008 Free Premium Wordpress Themes and BlackQuanta | Bloggerized by : GosuBlogger